Home Improvement on a Budget: Transform Your Property Quickly, Simply and Cheaply!
Author: John Nanto

Book Series: Home Design And Renovation

1. Welcome to Your New Home
They say that a man's home is his castle and this certainly is a true statement from many of our perspectives. In fact, it doesn't matter whether we live in a small home, a large home or anything in between, it is something that we take pride in. We want to make sure that it is as comfortable as possible for our family and us. At times, this requires upgrades and additions to the home, but we may be restricted because of our budget.
If you find yourself in this situation, there certainly are things that you can do to improve the look and feel of the home without hurting your budget. In fact, some of these home improvement projects make such a difference that you may wonder why you have not upgraded the home in other ways as well.
Taking a Look around the Home
In this book, we are going to discuss a number of different options that are open to you for upgrading your home. This would include upgrading the exterior of the home, adding some value to it (as well as curb appeal), and upgrading the interior of the home. It really depends upon where you want the fresh additions to your home to appear.
It is likely that you have had some ideas about what to do with the home, or there may be parts of the home that you are unhappy with, because it is not necessarily your style or simply because it is in need of an upgrade. You can be certain that any area of the home can find benefit through one of these budget home improvement projects.
In preparing this book, consideration was given to the budget and what it would take to transform your home through some of these projects. In addition, we have chosen home improvement projects that were relatively easy to complete. As long as you have a little bit of know-how, some common sense, and the proper tools, you can complete these projects and benefit from them.
Welcome to Your New Home
Take a look at some of the projects that are available in this book and choose one that would benefit you the most. You will find it takes very little time to complete the project, and once it is completed, you will have a new look and feel to that area of your home. It may also be possible that you will find a project that you had not considered before. Successfully completing one project will help to boost your confidence and give you encouragement to begin additional projects within the home.
2. Exterior: Refresh the Deck
Although many of us tend to spend the majority of our time indoors, the outdoors also provides a comfortable area for us to spend time with family and friends. If you have a deck attached your home or if you have one that is separated from the home, it can provide an atmosphere that will lend itself well to family gatherings and special times outside. Unfortunately, the deck can take a beating during the winter months, and it may not be looking its best. With a little bit of work on your part, you can have your deck looking like new again.

Initial Cleaning - It is important for you to clean the deck properly and to replace any wood that has become damaged before you do the finishing of the project. Typically, a low-pressure power washer with a wide spray is all that is going to be necessary to get the deck clean. Be cautious not to apply too much pressure from the pressure washer to the deck, because it can cause the grain of the wood to swell and may permanently damage it.
Inspect the Structure - Many of the problems that occur with the deck are going to be obvious to the eye. It could include wood that has become cracked, damage to the deck boards, or perhaps stairs that need shoring up. Take the time to ensure that the deck is also secure and that it has not begun to come loose from the house. Rather than simply looking at the deck from above, take the time to look at it from underneath and do a thorough inspection. Doing so will help to increase the security of the deck, and it will also help it to last for many years.
Allow the Deck to dry - This is a step that is often ignored by homeowners. After your have properly cleaned the deck, bleached it and made any repairs to damaged wood, you need to give it time to dry thoroughly. It is typically recommended that you wait a minimum of 3 days in which no precipitation has occurred. That will help to ensure that the deck is sufficiently dry for the finish to work well.
Apply the Sealer - Although the deck may appear to be in good shape at this point, it is not going to stay looking pristine. It will weather very quickly, unless you apply the finish. There are clear sealers available which allow the natural look of the wood to show through, but you can also choose one with a stain, if you want to change the way that it looks.
Spray the sealer onto the deck with a fresh pump sprayer, and use a foam applicator pad with an extension pole to apply the sealer to any areas that are difficult to reach. Pay attention to the instructions that came with the sealer to ensure that you do not begin to use the deck too quickly. Applying sealer is a relatively easy thing to do. You should be able to use your clean, new looking deck within a day or two.
3. Exterior: Plant a Tree
You might be surprised with the benefits that are offered when you plant a tree on your property. Not only can it lower your carbon footprint and beautify the area, it may also help to reduce your energy bill significantly, especially in the warmer months. Adding trees to your property is a relatively inexpensive thing to do, provided you make proper choices and plant them on your own. Here's how to do so.

How to Choose a Tree - There are a number of considerations for choosing a tree, and you should not take this part of the process lightly. You want to choose something that is going to be right for your property, both now and when it has grown to maturity. Consider the fact that a tree not only grows above ground, it also grows underground. The roots can cause considerable problems, if you do not plan properly. Additionally, some trees are going to take more effort to maintain than others.
Dig a Hole - One of the obvious things that need to be done when planting a tree is to dig a hole. Although this may be an obvious step, it is also an area in which more problems occur because people tend to dig a hole that is either too narrow or too wide.
You want to dig the hole in order to provide sufficient room for the roots. The roots get oxygen through the soil and digging the hole larger than the root ball will allow sufficient oxygen to reach the roots. As a general rule of thumb, you should dig a hole that is three times as large as the root ball. This will allow the roots to spread and to establish themselves.
Transplanting the Tree - It is always best for you to plant a tree as soon as you can after it has been obtained. Most trees will have their root balls in burlap and can quickly lose moisture. Lift the tree by the root ball, not by the trunk, and lower it into the hole. You should then remove the burlap from the top half of the root ball and begin to back fill the hole with a combination of soil, peat moss and compost.
Time to Water - A problem that can occur when you first plant a tree is that air pockets may exist in the soil. This could result in the tree losing stability and even developing root rot. When the tree is first planted, the soil should be thoroughly saturated in order to remove any air pockets.
Stabilize the Tree - When the tree is first planted, you will want to provide some additional stabilization until the root structure is able to establish itself. The easiest way to do this is to put stakes in a triangle around the tree. Attach the tree to the stakes by tying it off with baler twine. This is a temporary measure, and it can typically be removed within a few months after the tree has been planted.
4. Exterior: Add Lighting for Security and Beauty
If you really want to spruce up your property and make it look beautiful at night, you can add some outdoor lighting. This is something that will not only provide beauty to the home; it will also provide a degree of security if it is done properly. Here are a few different ideas for outdoor lighting that can really make a difference in the way that your home looks. Best of all, it is inexpensive if you do the work on your own.

Security Lights - If you simply want to illuminate the night and provide additional security for your property, you can add security lights. Most homes are wired for these lights and you will find the wiring under the eve in the corner of the house. If you do not have wiring available, you may need to contact an electrician to assist you in getting started.
Security lights can be installed so that they are switched on indoors, or they can be on motion detectors and can even be dusk to dawn lighting. You will want to choose one that gives you the highest degree of security while at the same time, providing you the convenience of illuminating the outside for any purpose.
Pathway Lights - As the name would suggest, pathway lights illuminate the walkways outdoors. They can be installed along the sidewalk at the approach of your home, or you can install them around the outside of your patio to help illuminate the area. Pathway lights cast their light down, which has a very unique look and can add beauty as well as safety to your home.
It is possible to purchase pathway lights that need to be hardwired, and this may be something that you want to consider. There are also pathway lights that are solar powered. They will gain their energy throughout the day and then illuminate the area at night.
Spot and Accent Lights - If you want to beautify your home and your landscaping, you can use a variety of spot or accent lights. These lights tend to cast their light upward and they can add a truly unique look to your home and landscaping. You can shine them through trees, bushes or even on the side of the home.
Most spot and accent lights are hardwired, so it may be necessary for you to hire an electrician for this job. It can truly give your property a different look and is relatively inexpensive project that is well worth the money.
Deck and Brick Lights - These unique lights can add a different look to your home and property by being incorporated directly into the structure. They can also add a degree of security to your home, as well as helping to beautify the property. Deck and brick lights are relatively easy to install and you can choose according to your budget and the existing look of the home.
5. Interior: Paint � the Miracle Cure
Do you really want to make a difference in the look of any room in the home? This is easy to do, simply by adding a fresh coat of paint. Adding paint to a room is an inexpensive project and it is one that can be done in the course of a weekend or even in a few evenings during the week. You will be surprised with what a difference a fresh coat of paint can make.

Prepare the Room for Painting - One of the most important considerations for painting any room in the home is preparing it for the job. It can truly make a difference in the finished project, as well as in how easy it is going to be to do the work.
You should go through the room and make any small repairs to the walls that are necessary. This would include plastering any small nail holes or dents that tend to accumulate through the years. You should also look for any bubbles in the existing paint or tiny bumps that can be scraped with the edge of a putty knife so that they don't show up any longer under the new paint.
If you tape the room off properly, it is also going to make a significant difference in the finished project. Purchase blue painters tape and apply it to the trim in the room, regardless of whether it is baseboard, chair rail or crown mold. Of course, you would not want to be messy when you are painting but any small mistakes are less likely to show up if it has been taped properly.
Gather Your Supplies - Make sure that you have all of your supplies available before the painting begins. This would include high-quality rollers and brushes, extension poles, and plastic sheeting to cover floors and furniture.
Stay in Motion - One of the biggest mistakes that most amateur painters make is that they try to do everything perfect on the first coat. The simple fact of the matter is, the first coat is never going to be perfect, and if you don't keep moving, it is likely that the imperfection is going to show up under the second coat as well. Put the paint on the wall, level it out and move on. Apply paint around the trim using a high quality brush so that you can use your roller without having to get too close to the edge.
Roll the Walls - Load your roller up with an even amount of paint and roll a W shape on the wall in order to distribute the paint properly. At that point, you should use an up-and-down motion to evenly distribute the paint on the wall for proper coverage. Try to overlap the cut edges to get full distribution.
Be careful that you don't have too much or too little paint on the roller. Try to keep the paint evenly distributed and use longer motions rather than shorter motions to achieve that purpose. Keep the edge of your paint area wet.
Once you have finished the first coat, apply a second coat. Even if you purchase a paint that promises to do the room in a single coat, the second coat is going to add a finish that will be easy to see.
6. Interior: Top It with Crown
In this book, you will find many simple projects that will make a difference in the look of the home while at the same time, sticking to a budget. Although adding crown to a room is something that requires a bit more skill, it makes a significant difference in how the room will look.
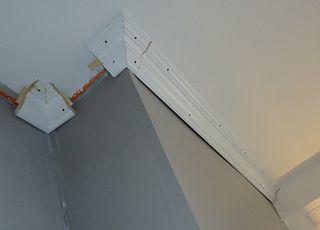
If you're going to do crown molding, you may need to rent some tools. Be sure that you have everything at your disposal that is necessary to cut and install the molding so that you can rent the tools for the least amount of time possible. Most major hardware stores, such as Home Depot, will have a tool rental department.
Purchase the Crown Molding - When purchasing crown molding for your home, be sure that you get it in as few pieces as possible. Most crown molding will come in lengths of either 12 or 16 feet, and you may be able to cut it to approximate length in the store. If at all possible, do not try to join two pieces of crown mold in the middle of a wall because it is difficult to get the joints to disappear.
Cut Your Practice Pieces - You should cut practice pieces for both the inside and outside corners of the room. This can help you to properly test the settings of the saw, and it will also help you to test the corners of the room to ensure that they are not too far out of square.
Make the Final Cuts - If there is ever a time where the axiom "measure twice, cut once" comes into play, it's in cutting crown molding. You should ensure that you are cutting the crown molding to the proper size and if necessary, cut it slightly large and then make several smaller cuts on one end until it fits perfectly into place. Line up your initial corner, and attach it to the wall and ceiling by putting it in place using one of the test pieces.
Work along the Room - As you are attaching the crown molding to the wall and ceiling, you should work from one end to the other end and not from both ends to the middle. In most cases, the wall will be straight enough that you can simply attach it to the wall without having to worry about shimming the crown. If the wall is too far out of square, it may be necessary for you to shim the crown and float the wall, but minor imperfections will not typically be noticed.
Caulk the Edges - It doesn't matter how tedious you are with cutting and installing the crown, there are going to be gaps. You can fill any gaps using white caulking that is paintable. It will make all of those tiny imperfections disappear, and once you paint the crown, it will have a professional look. If the edges don't quite come together on an exterior corner, use the handle of a screwdriver to gently press the pieces together by running it alone the sharp edge. It can then be filled with caulking and painted.
7. Interior: Upgrade the Thermostat
If you want to make your home energy efficient, one of the best ways for you to do so is to install a programmable thermostat. This is a relatively easy job and the impact that it has on your energy bill can be quite significant. Installing a programmable thermostat is also a budget friendly project and it is something that most homeowners can do. It requires only a small amount of time and a screwdriver.
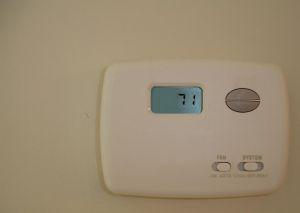
** Turn off the Power at the Breaker Box First **
Remove the Existing Thermostat - Obviously, you are going to need to remove your existing thermostat to install the new one. Remove the plate and cover until the backing of the old thermostat is visible. You should see a number of wires, which is typically anywhere from 2 to 8, depending upon your system. Take a picture of the wires and write down the wire color and the terminal to which it is attached. This can really help to make things easier for the next step.
Install the New Backboard - After disconnecting the existing wires from the terminals and removing the old backboard, you should install the backboard from the new thermostat and attach it to the wall. Refer to the list of wire colors and terminals so that you can connect the wires to the proper terminals on the new thermostat. Be aware of the possibility that you may have extra terminals on the new thermostat and not all of the terminals may have a wire attached to them. This is perfectly normal.
Snap the New Thermostat in Place - After the new backboard has been attached to the wall and wired, you should snap the new thermostat into place. Switch the furnace or HVAC system on at the breaker box to ensure that the thermostat is operating properly.
Program the Thermostat - One of the primary benefits of upgrading the thermostat is being able to program it so that you are saving money on your energy expenses automatically. When you program the thermostat, set it for a lower energy use during the times when you're not home. You may want to adjust the temperature during the times that you are sleeping as well.
Although you often read that the temperature of the home should be maintained at a steady level even when you're not at home, this is not true. You can save a significant amount of money by making large differences in the temperature on the inside of the home when you are not there. Simply program the thermostat to have the HVAC system adjust the temperature before you get home, and you will never notice the difference. That is, of course, except for the difference that you see on your electric bill.
8. Interior: Lighting Options for a Brighter Home
Although there are many different ways for you to brighten a room, one of the most effective ways of doing so is by changing the lighting. If you have been living in a home that seems to be dark all of the time, switching the lighting fixtures or perhaps adding new fixtures is going to make an instantaneous difference that you can be proud of. Here are two options that you may want to consider which range in difficulty from simple to difficult.

** Important ** - Before doing any type of electrical work at your home, it is important to shut off the breakers. You can either shut the breakers off that are specific to the area where you're working or turn off the main breaker, if you want to be as safe as possible.
Replacing Your Existing Light Fixtures - One of the easiest options that you have available for upgrading the lighting in your home is to replace the existing fixtures. When you do so, all of the wiring and the necessary hardware is already in place, so it is just necessary for you to wire the new light and hang it.
You should be cautious, however, if you are hanging significantly heavier light in the same area where a lightweight fixture was previously installed. The box where the fixture was attached may not be properly braced in order to carry the weight of the extra fixture. If you are not sure if the existing box has been attached directly to a ceiling joists or if a proper brace was used, it may be necessary for you to get into the crawlspace to see how it was attached.
In most cases, replacing an existing light fixture is going to be a fairly straightforward process. You likely have a few different wires that are coming into the box, a black, white and perhaps a red wire. There is also likely to be a ground wire in the box. Pay particular attention to how the old fixture has been wired. This will help to guide you in the wiring of the new fixture. In most cases, it will be black on black, white on white and ground to the green screw. Instructions will be included with the new fixture to help give you additional guidance.
Adding Wall Sconces to a Room - This project is a bit more difficult and will require some wiring on your part, but the effect can be quite stunning. If you want to add additional light to a room and you don't necessarily want a glaring overhead light, you can add wall sconces.
In most rooms, two or three wall sconces are all that are going to be necessary to provide a significant amount of light. If you put them on a rheostat, you can adjust the amount of light in the room easily, depending upon your particular needs.
It may be possible for you to do the wiring yourself, as you can go from an existing switch through the wall and into the crawlspace and then back down into the areas where the sconces will be installed. It may also be possible for you to run the wiring behind crown molding, although you do need to pay attention to local building codes.
If you are comfortable with doing the wiring yourself, it is a relatively easy project that can be completed with a minimal amount of work. If you're not comfortable with doing the wiring, you can hire an electrician but that will have an impact on your budget.
9. Interior: Bringing the Floors to Life
Although most people would consider replacing or refinishing floors to be a time-consuming and expensive project, there are ways for you to do it on a budget. If you want to have a significant impact on the home, doing anything with the floors is certainly going to provide that effect for you. In fact, replacing the floors or simply sprucing up those that are already in the home is one of the most important things that you can do, outside of adding a fresh coat of paint to the walls.

Concentrate on One Room
Rather than feeling as if you need to replace the floors in the entire home at one time, it is possible to do so one room at a time. You may find it possible to stick to a budget and you can methodically work your way around the home until all of the necessary floors are up-to-date.
Redo the Floors
Rather than trying to replace all of the floors, which can get expensive when all is said and done, it may be possible for you to make small changes to freshen up the existing floors. This can include redoing the grout on any tile floors in the home or cleaning existing floors using a commercial floor scrubber. You can rent a scrubber at your local hardware store in most cases.
If you are going to redo the floors, make sure that you go all out and do the extra work necessary to make them look as good as possible. Rather than simply cleaning the grout or scrubbing the dirt off of the tile floor, use a grout removal tool and replace it. Be sure that you seal the grout afterward so that it will stay fresh as long as possible. As far as cleaning the floor is concerned, take some extra time to get down through the dirt and the underlying finish. Apply some new sealer to the tile and it will be like new.
Adding Paint to the Floor
Although it is not the most popular option, you can certainly make a difference in the way that your home looks if you paint the existing floor. Floor paint is different than the paint that you put on the walls because it is durable and will stand up well to abuse. You may also need to use a primer in order to seal the floor properly before the paint is applied.
Although painting the floor can make a significant difference in the way that it looks, it is not a project that will last for the long-term. It is a temporary solution that will help to keep your floors nice-looking until you are able to afford to replace them.
10. Interior: Install a Ceiling Fan
Some projects that can be done around the home can not only be done on a budget; they will help you to budget as well. An example of this is installing a ceiling fan, which will help to save you money on your energy bills by making the rooms more comfortable. Installing a ceiling fan in the home is a relatively easy project, and it is one that can be done for a significantly lower price, provided you purchase an affordable fan.
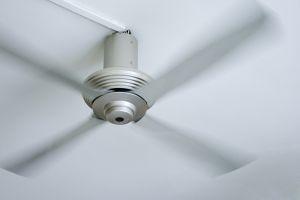
Choose Your Fan - There are so many different options available for choosing the ceiling fan that it is difficult to know where to begin. You want to choose one that is the proper size for the area where it will be working. You also want to choose how close to the ceiling the fan will be installed. If you are installing it in a room with a low ceiling, make sure that you choose a fan that is close to the ceiling. Otherwise, it may be possible for you to install a drop ceiling fan.
Remove the Existing Fixture - It is necessary to remove the existing light fixture where you will install the ceiling fan. If there is not a light fixture in place, you will need to hire an electrician or run the wire yourself and install a ceiling box with the proper bracing. Make sure you turn the power off to the ceiling box before you do any wiring, even if you have the switch turned off. It always helps to be safe in this regard.
Check the Support - In many cases, a ceiling fan is going to be significantly heavier than the existing light that was removed. You need to make sure that a proper support brace was installed above the ceiling level or that the existing ceiling box was attached firmly to a supporting joist. Installing the ceiling fan in an area where there is not proper support is dangerous and could result in injury or death if it should happen to fall on you.
Install the Bracket - Your new ceiling fan will come with a mounting bracket that should be installed in the existing ceiling box. The support bracket is not only going to hold the ceiling fan in place once it is installed, it often has a pin which will hold the ceiling fan motor housing temporarily in place while you do the wiring.
Wire the Fan - It is now time for you to wire the fan to ensure that it will operate properly when it is turned on. In some cases, you may have a fan and light combination and these can be separated, depending upon the wiring configuration. Take some time to look at the instructions that were included with the new ceiling fan, as they will help to guide you through the various scenarios of how the wiring may take place. It is important to get the wiring completed properly before the installation occurs, because it can be a real hassle to have to remove the fan to rewire it.
Connect the Accessories - After you have attached the fan motor to the mounting bracket, it is necessary to install the various accessories that may have been included. The fan blades are typically the first thing that is installed and these will likely have several screws, which should be hand tight. You may also need to attach the light fixture that was included with the fan.
Install the Wall Switch - Once the ceiling fan is in place, it is time for you to install the wall switch and to test the ceiling fan. Most people prefer a standard switch for the ceiling fan, although there are some combination switches if you have separated the light and fan operation. After installing the wall switch, turn on the breaker and test the operation of the fan.
Balance the Fan - Although it is not often necessary for you to have to do this step, there may be times when the fan wobbles because it is out of balance. There should be balancers included in the installation kit that can be attached to the ceiling fan blades to keep them in balance.
11. Interior: Seal the Leaks and Save
In the previous chapter, we discussed installing a ceiling fan in the home, which can be done on a budget and will make a significant difference in your energy costs. In this chapter, we are going to discuss a home improvement project that will not likely make a difference in the way that your home looks, but it will make a difference in how much you spend on energy. Best of all, it is extremely inexpensive, and it is something that almost every home can benefit from on a periodic basis.

All homes have air leaks, some of which are easy to detect and others that may require additional assistance to detect. These air leaks are a source of discomfort and in most cases, the exchange of energy between outside and inside is going to show on your energy bill. There are several different things that you can do to detect these air leaks and once they are found, they can be fixed with anything from a little bit of caulking to some weather stripping.
Taking a Closer Look
A visual inspection of the home is the first step that needs to be taken to determine if there are any obvious air leaks.
Look at the exterior of the home carefully in any area where the outside of the home may be damaged. This could be at a corner of the home, where the chimney meets the siding, around the outdoor water faucets or even where the foundation meets the siding or exterior brick. A visual inspection of these areas will usually turn up a few problems that can be fixed with a minimal amount of effort.
You should also look for any gaps or cracks that are inside of the home, as these may be a source of air leaks as well. Some of the areas that are often overlooked by homeowners include electrical outlets, baseboards, window frames and doors, where the phone line and the TV cable enter the house, vents, fans, fireplace dampers, utility service entrance and the door to the attic.
Any caulking or other sealant that has been applied to the interior or exterior of the home should also be inspected. If there are cracks that have begun to form in the seal, it is likely that it is allowing air to pass through.
Pressurize the Home
After the visual inspection has taken place, you can do a further inspection by pressurizing the home and testing it with an incense stick. Here is the basic method that is used for this purpose.
First of all, you should turn off appliances that use combustible gas, such as a gas stove, water heater or a furnace. You should choose a day that is as windy as possible because it will help to make it easier for you to detect leaks.
Close every opening of the home, including the fireplace flutes, windows and doors. After you have sealed the home properly, turn on any exhaust fans to pull the air from inside of the home. If you have a window fan that seals in the window properly, this can also be used.
Now that your home has been properly pressurized, use an incense stick and pass it by areas that could experience a problem with air leakage. The smoke from the incense stick should be steady and straight up but if it wavers or if you see any change in the direction of the smoke, it means that a leak is in the area.
Infrared Leak Detection
If you want an even better way to test for air leaks in the home, you can rent an infrared leak detection device. These can typically be rented at Home Depot, or you may want to purchase one so that you can test for leaks on a periodic basis.
An infrared thermal leak detector will use sensors that will measure the surface temperatures of the walls, windows and doors inside of the home. It will show you, at a glance, where any leaks may exist because of temperature variations. It can allow you to check your home carefully and quickly for air leaks so that you can plug them and enjoy lower energy costs.
12. Home Entry: First Impressions with a Painted Door
Making a first impression is important, and you would want to ensure that anyone visiting your home had a good first impression of it. One way for you to achieve this is to paint the front door, which is budget friendly, relatively easy to do and can make a significant difference in a small amount of time. Not only will any visitors to your home appreciate the efforts that you made, you are also going to love the way that your home looks when the front door has a fresh coat of paint on it.

Clean the Door - The first step in the process is to prepare the door to accept the new coat of paint. In order for you to do this properly, it is best for you to remove the door from its place. You can do this by removing the hinges using a slotted screwdriver to take out the hinge pins. Be aware of the fact that the door is going to be heavier than a standard interior door, so it may be necessary for you to get help to lift it from its position and place it on sawhorses.
All of the hardware is going to need to be removed from the door in order to make it easier for you to paint it. This will include the doorknob, hinges, locks, doorknockers and even the peephole. Once all of those items have been removed, you should clean the door thoroughly.
Cleaning the door may be a simple matter of washing it with soap and water but it may also be necessary for you to clean it more thoroughly with denatured alcohol. That will help to remove any of the oxidized paint that may be on the door because of exposure to sunlight throughout the years. Ensuring that the door is properly cleaned will help the paint to adhere to it.
Further Preparation of the Door - Additional preparation may be necessary before the door is painted. If it is a wooden door, there may be cracks that have appeared around the edges of the trim that will need to be filled and sanded using wood filler or an epoxy. Any nail holes that may be in the door will also need to be filled and sanded.
Take your time in this preparation process to ensure that the door is as close to factory condition as possible. Any issues with the door are going to show up under the paint and are going to reduce the quality of the job that you do. It is better for you to take the extra time now to ensure that the door is as prepared as possible for the new paint.
Primer - It is always a good idea to apply primer before you apply paint, especially to the front door. This is particularly of interest if the door has been damaged in any way and filler has been applied to it. When you apply primer to the door, it gives you a solid base coat that is of a single color, which will help the final coat of paint to be flawless.
After you apply the primer to all surfaces of the door, you should go over it with a fine toothcomb. If there are any small cracks or imperfections in the door, they should be filled and sanded. Additional primer should be applied as needed. The entire surface of the door should now be sanded lightly with 220 grit sandpaper to remove any particles that may have been in the primer. You are not sanding to the extent where you are removing the primer, you simply want a smooth base coat under the paint.
Painting the Door - Any edges around the panels and inserts should be painted with a small angle paintbrush. It is important for you to use a quality paintbrush so that drips, runs and heavy areas of paint will be less likely to happen. Since you are painting on a flat surface, it may also tend to puddle in certain areas and you may need to work carefully. Do not apply the paint too heavy because you will be applying multiple coats.
A small roller can be used to apply the paint to the raised panels and other flat edges of the door. Pay attention to the grain of the wood and roll the roller with the grain rather than against it. Be sure to finish painting a single area before you move on to the next. That will help to keep the paint wet on the edges and ensure a more even finish.
Several coats of paint need to be applied to the door, and you should continue to use the same method that was described above. Darker colors that are used for the door are going to require additional coats in order to get an even appearance. Allow the side of the door that is being worked to dry thoroughly before you turn it over and paint the other.
Replace the Door - At this point, you will need to replace all of the hardware that was removed and to put the door back into place. Be very careful that you don't move the hardware excessively on the door, because it may be possible to scratch the paint, especially when it is still fresh. Don't be too quick to replace the door, you want to be sure that it is completely dry so that the paint will not stick to the weather stripping and peel off when you open it.
13. Kitchen: Refinish the Cabinets
One of the areas of the home that many homeowners would like to upgrade but tend to overlook is the kitchen. After all, doing any extensive work on the kitchen is expensive and can be a significant investment of time as well. Of course, there are some things that you can do to the kitchen, which will help to upgrade the look, freshen it up and even make it look new. One of those projects is to refinish the cabinets, something that can be done with some paint, time, elbow grease and a little bit of patience.
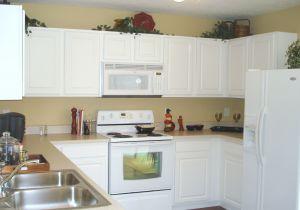
If you notice that the cabinets in your home are getting old and you know that it is time to replace them, painting them can be a viable alternative. Rather than having to replace the cabinets themselves and all of the expense that is involved, a fresh coat of paint and a weekend of time can help to make a difference in the way that your kitchen looks. Besides which, it will brighten and add value to the home. Here are the steps that you should take when painting the cabinets in the home.
Proper Preparation Is Vital - Although there are a few steps needed to paint your kitchen cabinets, it is the preparation of the cabinets themselves that is most important. After all, unless you prepare the cabinets properly, you can never expect to have a glossy coat finish that is going to look beautiful and professional. In addition, without properly preparing the cabinets, you can never expect to have the paint stick properly, and that will cause issues down the road that are better avoided.
In order to prepare the cabinets, you need to clean them and to remove the years of grime, cooking grease and fingerprints that have built up on the surface. It doesn't matter if you have cabinets that are already painted or if you are going to be painting over finished wood, take the time to clean them. Begin by removing the doors and the hardware.
A lot of the dirt and grime can be removed with soap and water, but it may be necessary for you to use a degreaser to remove much of the additional grease that may have found its way onto the sides of the cabinets. The strength of the degreaser that is used may vary, depending upon how heavy the buildup is on the cabinets. After you have cleaned them thoroughly, use heavy grit sandpaper to rough up the surface of the cabinets so that the primer will stick properly.
Apply the Primer - It is very important for you to use a high-quality primer on the surface of the cabinets. This is a step that should not be overlooked, because it can make a difference in the quality of the paint job.
There are many different types of primers that are available but you want to use one that is known as a sandable primer. It will go on thicker than a regular primer and will likely have some particles in it that will need to be sanded smooth before you paint it. It will provide a better undercoat for the paint and will fill the grain of the wood so that the finish paint job will be smooth and glassy. After applying the primer, use 220 grit sandpaper to lightly sand the primer and remove any grit. You don't want to remove the primer; you just want an ultra-smooth finish under the paint.
Choosing Your Paint
There are a few different options available when it comes to choosing paint for your cabinets. If you want the hardest finish and the smoothest finished look with the completed project, you want to use an oil-based paint. Although it can be difficult to work with oil-based paint, it is difficult to beat the end product. Of course, there are some issues that are involved in using oil-based paints, such as the fumes, and it can be messy to clean up the equipment at the end of the day.
There are also some latex paints that will come close to oil-based and will not have the VOCs, which can cause a problem in your home. If you are going to use latex paint for the job, make sure that you use an acrylic paint because it will have a better flow and will self-level on the cabinets to help fill any imperfections and leave you with a smooth finish.
The entire area needs to be further prepared by applying painter�s tape to ensure that the countertop, backsplash and other surrounding areas are not affected by the paint. Even though you are taping off the area, you should still be cautious not to paint on those areas, because it may be possible to bleed under the tape in some cases.
Begin applying the paint with a high quality, chiseled paintbrush. Paint the back of the doors before painting the fronts so that you are not running the risk of damaging the paint on the exposed part of the door. Take care of any panels first and then work your way in an outward direction to the styles and rails. Be careful not to apply too heavy a coat to avoid drips and runs. You will be applying multiple coats for a smoother finish so you should not try to take care of the entire job on the first coat.
Once the paint has been applied and a minimum of two hours has been allowed to pass to give the paint a chance to dry thoroughly, it is time to rehang the doors. At this point, you will need to replace the hardware and, with a little bit of additional money in your budget, you can replace it with new hardware that will help to spruce up the area even further. Be cautious when replacing the doors or any hardware so that you don't scratch the new paint, which may be a little soft until it dries further.
14. Bathroom: Freshen up with Caulk
Many of the home improvement projects that can be done in the bathroom are difficult to do and may be out of the financial reach of those who are on a tight budget. There are some projects that can be done, however, which are budget friendly, easy to accomplish, and will help to freshen up the look of the bathroom significantly. One of those jobs is replacing the caulk and freshening up the edges of the tub, cabinets and other areas that may have become dingy, moldy and damaged.

Some people tend to avoid caulking because they believe it is too difficult a task. The fact of the matter is, however, with a little bit of practice and the right tools, it is possible for anybody to do a professional job. Admittedly, there is a certain touch that professionals may have which allow them to caulk a room in a matter of minutes. It may not be possible for you to achieve this level of professionalism but with a little work, no one will know that the caulking was done by an amateur.
Choose Your Caulk and Dispenser
The first step in the process is to choose the type of caulking that you are going to use and the dispenser that will be necessary for the job. Although there are number of different types of caulk available, the two primary types that you can choose are either latex or silicone-based.
Depending upon who you talk to, they may tell you that for wet areas, such as around the tub, toilets and sinks, you will want to use a silicone-based caulk. In reality, however, silicone is difficult to work with and it is not going to be as easy for you to get the professional finish that you desire. You can get latex caulk that is specific for tub and tile use and it will provide a smooth, professional finish that will last for years.
As far as the dispenser is concerned, you can either get the individual squeeze tubes that are handheld or you can purchase a caulking gun and the cartridges that go into it. This is a personal decision but for ease-of-use and for the most professional finish from an amateur, you will likely want to choose the individual squeeze tube with a latex, tub and tile caulk.
Removal of the Old Caulk
In order for you to get a truly professional job, it is necessary for you to remove the old caulk and to properly prepare the surface. If you were to try to simply cover over the old caulking that may be moldy or cracked, it is eventually going to show through and you will not get the professional look that you desire.
Using a retractable blade scraper is the easiest way for you to remove the old caulking. Razor scrapers can get into difficult areas and will work on most bathroom surfaces. This is an effective, easy way for you to remove caulking so that you have a smooth surface to work with. Any small pieces of caulking that are left on the surface should be scraped until it is clean. The old caulking can be removed from the area easily with a shop-vac and you should thoroughly wash the area where you will be applying the caulking to remove any soap scum or grime. Allow the area to dry thoroughly.
Prepare for Professional Appearance
Blue painters tape is not only used to tape off the edges of the room when you're painting, it can also be used when you are caulking as well. One of the difficulties that many amateurs have when applying caulk is that they have too wide an area where the application takes place. This can end up looking very unprofessional, but it is easy to rectify with some painters tape.
Both edges of the area that are about to be caulked should be masked using painter�s tape. Be sure to apply the tape in long strips rather than short strips, because it will give a cleaner, straighter edge. It is necessary for you to leave a small amount of space where the caulking will actually adhere to the surface. Typically, 1/4" of caulking is all that is necessary to give a professional appearance. Run your finger over the edge of the tape several times to ensure that it has adhered properly to the surface.
Apply the Caulking
The tube of caulking should be cut a 45� angle and, if you are using a tube with an inner seal, it should be punctured with a piece of wire or a nail. The caulking should be applied to the surface with the tip held at a 45� angle and you should work in a smooth, slow-motion to get a nice bead of caulk without over-doing it. It will not take you long to get a rhythm that works well for you and the amount of pressure that you must apply to the tube.
After the caulking has been applied, it is necessary to smooth it so that you will get a finished joint with a professional look. This is typically done with your finger, although there are some tools available which will make it possible to get a professional look as well. If you used latex caulking, you can wet your finger with water but if you use silicone, you should wet your finger with alcohol.
Smooth the caulking in one continual swipe from end-to-end. If you end up with a lot of caulking on your finger, wipe it on a wet rag or paper towel and continue with the process. It may be necessary for you to work in both directions and to go over the caulking several times in order to get a smooth, flawless finish. Don't be too concerned about the caulking that is spreading onto the blue tape, it will come off of the next step.
Remove the Masking Tape
After the caulking has been smoothed, it is important to remove the masking tape immediately. You should not allow the caulking to dry, or you will end up having a torn edge and an unprofessional look. The masking tape should be pulled away from the area at an angle that is away from the caulking and not toward it. Use one smooth, slow motion to remove all of the painters tape and you will be left with a professional looking seam.
15. Garage: Customize a Workbench
Most of the home improvement projects that were discussed in this book would be in the public eye. Regardless of whether they were fixing up something on the outside of the home or fixing up something on the inside, it would provide a benefit that was either seen or felt by anyone in the immediate area. In this chapter, we are going to discuss customizing a workbench that will be in your garage, outdoor shed or other area that is not typically seen. It can help you, however, to have an area where you can do additional tasks and improvements on the home easily.
Choose Your Space
One of the most important considerations for customizing a workbench is choosing an area that will be convenient for you to use it. In some cases, a workbench is simply going to be an area where items will be held while they are worked on and it will not require too much of a mess otherwise. If that is the case, it can be included in the garage or other area of the home that may be in close proximity to your automobiles or other valuable goods. If you plan on doing any sawing, sanding or heavy work that would create a considerable amount of dust, you would want to take that into consideration.
You should also choose an area that is in close proximity to adequate light and electrical outlets. If necessary, you may need to run additional outlets so that you can hang some fluorescent lights to make it convenient for you to work in the area. Although it is always possible for you to run electrical cords for that purpose, it is also inconvenient to do so.
Choose Your Workbench Materials
There are a number of options that are available for building a workbench. If you have any old cabinetry available, it is perhaps the most convenient option because it will give you both a solid base for the workbench and a convenient storage space as well. If you don't have any old cabinetry available or if you would like to use it elsewhere in your workshop, it is still possible for you to construct a solid workbench that will have all of the storage that you need.
Find a Bench top - Having a solid top to your workbench is vitally important to ensure that you are able to work on it properly. There are a number of options available for this purpose, but if you're on a budget, it is unlikely that you are going to want to spend a lot of money on butchers block or similar products.
In most cases, a double thick layer of three-quarter inch plywood or some 2 x 8's will be sufficient for the project. The wider the boards that you use for your workbench, the more convenient it is going to be. You can also add a thin layer of plywood to the top to give it a smooth finish.
Brace the Legs - The legs of the workbench should be made from 4 x 4's and you should run a brace 2 x 4 between the two end pieces and along the back of the workbench to help keep everything in place. You can also add an additional brace to the front of the workbench, and the 4 braces will provide a convenient area where you can install a shelf to hold tools and other items. The legs and braces should be held together with lag bolts to provide additional security.
Mount the Workbench Properly - After you have put the workbench together and have it as solid as possible, you can attach it in place. Although it may be convenient, at times, to have a workbench that can be moved from one area to another, it is always best if you have it mounted and attached to the wall so that it will be as solid as possible. This will help to avoid any movement in the bench when you are working with it. It will also provide a degree of safety for anyone in the area.
Add cabinets and Pegboard - For additional convenience, you will want to add cabinets and pegboard to the area. This will allow you to store many items, both large and small so that you can have access to them at a moments notice. It will also help to finish the workshop off nicely and will help to keep many of your tools and other items in an enclosed area so that they are not constantly getting dusty as you are working on the workbench. You can then purchase pegboard hooks in a wide variety of options to hang anything and keep it up off the surface of your workbench.